Spring Data JPA를 공부하면서 궁금한 것이 있었습니다.
public interface MemberRepository extends JpaRepository<Member, Long> {

    List<Member> findAllByName(String name);
}
위와 같이 MemberRepository는 인터페이스고, @Repository 애노테이션을 붙여 놓지도 않았는데, 다음과 같은 코드가 가능했습니다.
@Service
public class MemberService {

    private final MemberRepository memberRepository;

    public MemberService(MemberRepository memberRepository) {
        this.memberRepository = memberRepository;
    }

    public Member save(Member member) {
        return memberRepository.save(member);
    }

    public List<Member> findAllByName(String name) {
        return memberRepository.findAllByName(name);
    }
}
우리는 MemberRepository를 구현한 구체 클래스도 안 만들어줬는데 도대체 어떤 Bean이 주입되는 것일까요? 그리고 save()와 findAllByName 메서드를 구현하지도 않았는데 왜 메서드가 정상 작동하는 것일까요??
지금부터 그 비밀을 파헤쳐 보도록 하겠습니다.
먼저, debug 모드로 userRepository에 주입되는 Bean의 정체를 알아봅시다.

memberRepository의 실제 객체를 보니 Proxy가 주입되어 있습니다. 그리고 그 Proxy는 SimpleJpaRepository를 타겟으로 가지고 있습니다. 결과적으로 다음과 같은 구조인 셈입니다.

이전 AOP포스팅 에서 AOP를 적용할 때 스프링이 프록시를 동적으로 생성해준다는 내용이 있었는데요. Spring Data JPA를 사용할 때, Repository도 스프링이 적절한 프록시를 생성해주고 있었습니다.
그렇다면, 스프링은 어떻게 동적으로 Proxy를 만들어 줄까요?
Reflection
동적으로 프록시를 생성하는 기능의 핵심은 바로 '리플렉션'입니다.
예제 코드로 아주 간단하게만 알아보겠습니다.
public class Item {

    public static String id = "oldId";

    private String name = "book";

    public Item() {
    }

    private Item(String name) {
        this.name = name;
    }

    private int sum(int a, int b) {
        return a + b;
    }

    @Override
    public String toString() {
        return name;
    }
}
위와 같은 Item 클래스가 있을 때, Reflection을 이용하면 아래와 같은 코드를 작성할 수 있습니다.
@Slf4j
public class ItemApp {

    public static void main(String[] args) throws NoSuchMethodException, InvocationTargetException, InstantiationException, IllegalAccessException, NoSuchFieldException, ClassNotFoundException {

        Class<Item> itemClass = (Class<Item>) Class.forName("com.example.reflection2.Item");

        Constructor<Item> defaultConstructor = itemClass.getDeclaredConstructor(null);
        Item item1 = defaultConstructor.newInstance();
        log.info("item1 : {}", item1);

        Constructor<Item> constructor = itemClass.getDeclaredConstructor(String.class);
        constructor.setAccessible(true);
        Item item2 = constructor.newInstance("cup");
        log.info("item2 : {}", item2);

        Field id = Item.class.getDeclaredField("id");
        log.info("id : {}", id.get(null));

        id.set(null, "newId");
        log.info("id : {}", id.get(null));

        Field name = Item.class.getDeclaredField("name");
        name.setAccessible(true);
        log.info("name : {}", name.get(item2));

        name.set(item2, "phone");
        log.info("name : {}", name.get(item2));

        Method sum = itemClass.getDeclaredMethod("sum", int.class, int.class);
        sum.setAccessible(true);
        Object result = sum.invoke(item1, 1, 2);
        log.info("result : {}", result);
    }
}
결과
16:03:59.546 [main] INFO com.example.reflection2.ItemApp - item1 : Item{name='book'}
16:03:59.563 [main] INFO com.example.reflection2.ItemApp - item2 : Item{name='cup'}
16:03:59.563 [main] INFO com.example.reflection2.ItemApp - id : oldId
16:03:59.564 [main] INFO com.example.reflection2.ItemApp - id : newId
16:03:59.564 [main] INFO com.example.reflection2.ItemApp - name : cup
16:03:59.564 [main] INFO com.example.reflection2.ItemApp - name : phone
16:03:59.564 [main] INFO com.example.reflection2.ItemApp - result : 3
리플렉션 기술을 사용하면 클래스나 메서드의 메타 정보를 동적으로 획득하고, 코드도 동적으로 호출할 수 있습니다. 심지어 private 접근 제어자가 붙어있는 메서드에도 접근할 수 있습니다. 이렇게 메타정보를 이용해서 클래스, 필드, 메서드 정보를 얻는다는 것은 정보를 동적으로 변경할 수도 있게 됩니다. 결과적으로 동적인 객체 생성, 동적 메서드 호출 기능 등을 사용 할 수 있는데 Spring에서는 DI, Proxy 등에서 리플렉션이 사용됩니다.
이러한 특징을 기반으로 Dynamic Proxy에서 리플렉션을 어떻게 사용하는지 알아보겠습니다.
먼저 프록시를 생성하는 예제 코드를 본 다음에 실제 스프링 코드를 디버그 하면서 알아보도록 하겠습니다.
public interface Repository {

    void save(String itemId);
}
@Slf4j
public class SimpleRepository implements Repository {

    @Override
    public void save(String itemId) {
        log.info("Save Item. itemId = {}", itemId);
    }
}
public interface CustomRepository extends Repository {
}
Spring Data JPA의 구조를 단순화 시켜봤습니다. 이렇게 구현된 코드에서 프록시를 만들기 위해서는 먼저 InvocationHandler를 만들어야 합니다.
@Slf4j
public class RepositoryHandler implements InvocationHandler {

    private final Repository target;

    public RepositoryHandler(Repository target) {
        this.target = target;
    }

    @Override
    public Object invoke(Object proxy, Method method, Object[] args) throws Throwable {
        if ("save".equals(method.getName())) {
            log.info("save() in proxy");
            return method.invoke(target, args);
        }
        return method.invoke(target, args);
    }
}
제공되는 파라미터는 다음과 같습니다.
- Object proxy : 프록시 자신
- Method method : 호출한 메서드
- Object[] args : 메서드를 호출할 때 전달한 인수
스프링에서 Dynamic Proxy는 위와 같이 InvocationHandler를 구현하여 사용할 수 있습니다. 이렇게 만든 Handler로 프록시를 생성해보도록 하겠습니다.
public class ReflectionTest {

    @Test
    void reflectionTest() {
        RepositoryHandler repositoryHandler = new RepositoryHandler(new SimpleRepository());
        CustomRepository customRepository = (CustomRepository) Proxy.newProxyInstance(
                CustomRepository.class.getClassLoader(),
                new Class[]{CustomRepository.class},
                repositoryHandler
        );

        customRepository.save("ITEM22");
    }
}
동적 프록시를 생성할 때는 클래스 로더 정보, 인터페이스, 그리고 핸들러를 넣어주면 됩니다. 그러면 해당 인터페이스를 기반으로 동적 프록시를 생성하고 그 결과를 반환해줍니다.
출력 결과
18:47:12.038 [main] INFO com.example.reflection.RepositoryHandler - save() in proxy
18:47:12.041 [main] INFO com.example.reflection.SimpleRepository - Save Item. itemId = ITEM22
정상 수행된 것으로 보아 CustomRepository 타입의 객체가 만들어지고 save() 메소드가 정상 수행된 것을 확인할 수 있습니다.
그렇다면 실제 스프링에서는 프록시 객체가 어떻게 생성되는지 알아보도록 하겠습니다. (지금부터 나오는 모든 디버깅은 핵심 코드만 보기 위해 살짝 편집했습니다. 실제 코드와는 조금 다릅니다.)
public static Object newProxyInstance(ClassLoader loader,
                                          Class<?>[] interfaces,
                                          InvocationHandler h) {
    Objects.requireNonNull(h);

    final Class<?> caller = System.getSecurityManager() == null
                                ? null
                                : Reflection.getCallerClass();

    /*
     * Look up or generate the designated proxy class and its constructor.
     */
    Constructor<?> cons = getProxyConstructor(caller, loader, interfaces);

    return cons.newInstance(new Object[]{h});
}
Proxy 클래스의 내부입니다. 코드를 살펴보면 클래스 로더와 인터페이스 타입으로 Constructor를 만들어주고 InvocationHandler를 이용해서 Proxy Instance를 생성해 반환하고 있습니다. 조금 더 디버깅을 해보면, ProxyGenerator 클래스 내부에서 프록시 클래스를 바이트코드( .class file )로 직접 만드는 코드를 볼 수 있습니다.
//Generate a proxy class given a name and a list of proxy interfaces.
static byte[] generateProxyClass(ClassLoader loader,
                                     final String name,
                                     List<Class<?>> interfaces,
                                     int accessFlags) {
    ProxyGenerator gen = new ProxyGenerator(loader, name, interfaces, accessFlags);
    final byte[] classFile = gen.generateClassFile();

    return classFile;
}
generateClassFile() 메소드에서는 적절한 메서드들을 만들어주고 있습니다.
private byte[] generateClassFile() {
    visit(V14, accessFlags, dotToSlash(className), null,
            JLR_PROXY, typeNames(interfaces));

    /*
     * Add proxy methods for the hashCode, equals,
     * and toString methods of java.lang.Object.  This is done before
     * the methods from the proxy interfaces so that the methods from
     * java.lang.Object take precedence over duplicate methods in the
     * proxy interfaces.
     */
    addProxyMethod(hashCodeMethod);
    addProxyMethod(equalsMethod);
    addProxyMethod(toStringMethod);

    /*
     * Accumulate all of the methods from the proxy interfaces.
     */
    for (Class<?> intf : interfaces) {
        for (Method m : intf.getMethods()) {
            if (!Modifier.isStatic(m.getModifiers())) {
                addProxyMethod(m, intf);
            }
        }
    }

    generateConstructor();

    for (List<ProxyMethod> sigmethods : proxyMethods.values()) {
        for (ProxyMethod pm : sigmethods) {
            // add static field for the Method object
            visitField(ACC_PRIVATE | ACC_STATIC | ACC_FINAL, pm.methodFieldName,
                    LJLR_METHOD, null, null);

            // Generate code for proxy method
            pm.generateMethod(this, className);
        }
    }

    generateStaticInitializer();
    generateLookupAccessor();
    return toByteArray();
}
intf.getMethods() 부분에서는
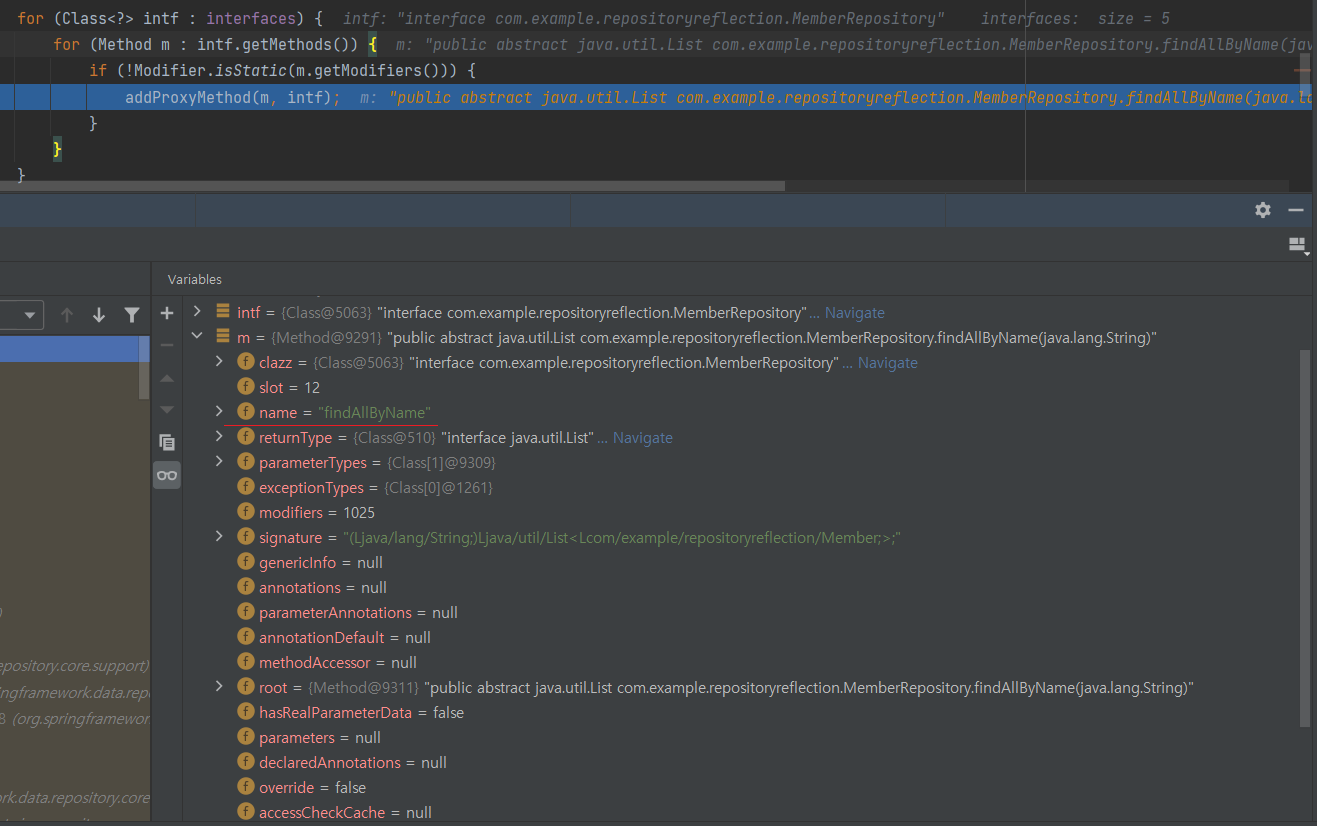
인터페이스에 선언만 해놓았던 findAllByName() 메소드도 추가해주는 것을 볼 수 있습니다. 즉, 리플렉션을 이용해서 동적으로 메소드와 클래스를 .class 바이트 파일로 만들어 주고 있습니다.
JPA Repository Proxy
그럼 마지막으로 Repository를 만들 때 진짜로 Proxy가 쓰이는지 알아보겠습니다.
동적으로 Repository 프록시를 만들어주는 RepositoryFactorySupport 클래스입니다.
// Returns a repository instance for the given interface backed by an instance providing implementation logic for custom logic.
public <T> T getRepository(Class<T> repositoryInterface, RepositoryFragments fragments) {

    // Create proxy
    StartupStep repositoryProxyStep = onEvent(applicationStartup, "spring.data.repository.proxy", repositoryInterface);
    ProxyFactory result = new ProxyFactory();
    result.setTarget(target);
    result.setInterfaces(repositoryInterface, Repository.class, TransactionalProxy.class);**

    T repository = (T) result.getProxy(classLoader);

    return repository;
}
'Create Proxy' 부분을 보면 ProxyFactory()를 통해 ProxyFactory를 만들고 target 설정, interface 설정을 하고 있습니다. 그리고 getProxy()를 통해서 repository를 생성해줍니다. ( ProxyFactory는 스프링이 내부적으로 Proxy를 생성하는 부분을 추상화하여 간편하게 사용할 수 있도록 해주는 클래스입니다. )
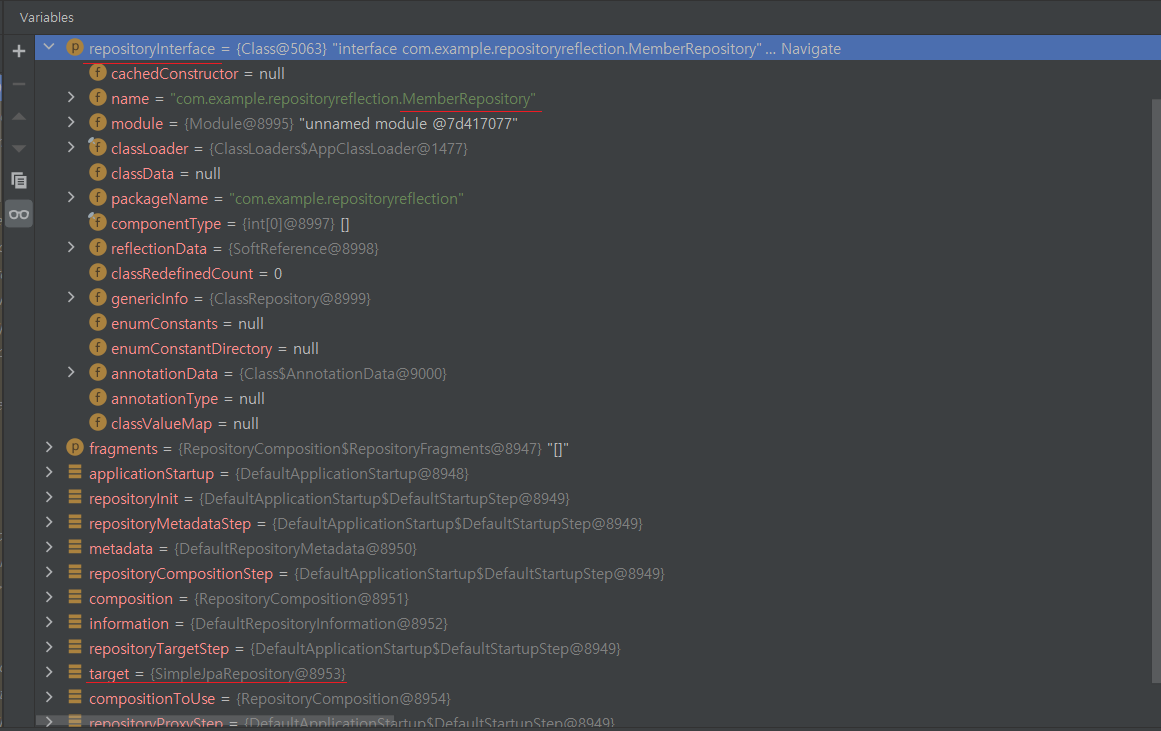
디버깅을 내용을 살펴보면 interface는 MemberRepository, target은 SimpleJpaRepository인 것을 확인할 수 있습니다. 이러한 과정을 보면 스프링은 MemberRepository를 구현하는 객체를 생성해주고 있었습니다. 처음에 나왔던 save()메소드는 target인 SimpleJapRepository에게 요청을 위임하고, 사용자가 만들었던 findAllByName() 메서드도 동적으로 만들어주고 있었습니다.
마무리
이상으로, Spring Data JPA에서 interface만으로도 코드가 정상 동작하는 이유에 대해서 알아보았습니다. 한 줄로 정리를 해보면 스프링은 사용자가 정의한 Repository 인터페이스를 구현하고 SimpleJpaRepository를 target으로 포함하는 Proxy를 동적으로 만들어준다!! 또, 그 Proxy를 Bean으로 등록해주고 연관관계 설정이 필요한 곳에 주입도 해준다!!라고 할 수 있겠습니다. 스프링 덕분에 정말 편하게 하는 것이 많네요 ㅎㅎ. 다시 한번 스프링에게 감사의 인사를 드리고 마치겠습니다. 스프링아 고맙다!!
참고
https://parkadd.tistory.com/106
https://engkimbs.tistory.com/821https://taes-k.github.io/2021/05/15/dynamic-proxy-reflection/
https://www.baeldung.com/java-proxy-pattern
https://www.baeldung.com/java-reflection
'JPA' 카테고리의 다른 글
| 동적인 쿼리를 만들어줘! QueryDSL 입문기 (0) | 2021.12.28 |
|---|
